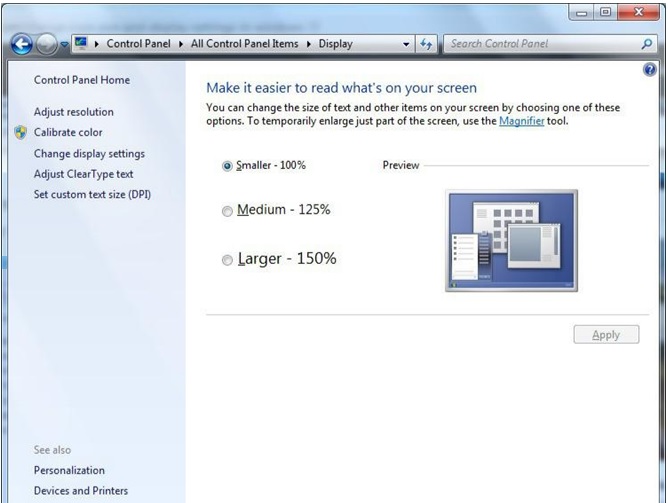
Display Settings: Changing the display settings in windows 7
1. In Windows, click Start, click Control Panel, then click Display.
2. To change the size of text and windows, click Medium or Larger, then click Apply. The screenshot is shown below
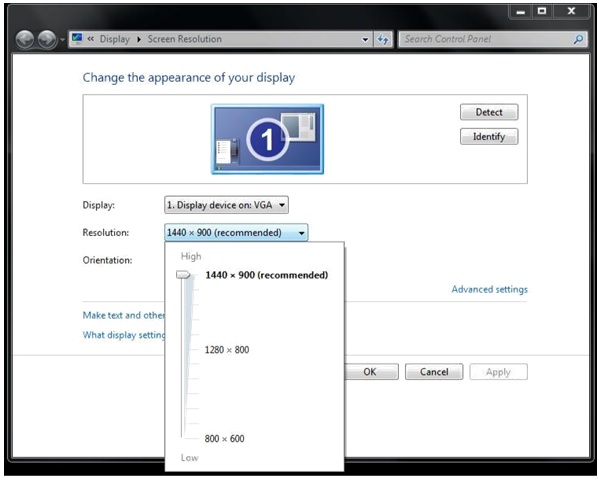
Screen Resolution: To change screen resolution in windows 7
1. Right-click the desktop and click Screen resolution.
2. Click the image of the monitor that you want to adjust.
Changing the display settings in windows 10
1. Right-click on desktop screen, select "Display settings".
2. To customize your display.

Changing screen resolution in windows 10
1. Click on "Advanced display settings" on the bottom.
2. Select the appropriate resolution, and click on "Apply" to save the change. The screenshot is shown below

When the screen resolution is set to very low, then the text size becomes larger, and sometimes it may result in some portions of the text not viewable. Set the screen resolution properly using the properties window. Refresh rate results in screen flickering (if the refresh rate is too low), and nothing to do with resolution.
Configuring Multiple displays
1. To configure multiple displays on Windows 7
1. Click "Start" button -> Control Panel -> Appearance and Personalization -> Personalization ->Display Settings
2. To configure multiple displays on Windows 10 :
1. Right-click on desktop, click Personalize option to open Personalization section of Settings app
2. On the left-pane, click Themes to see Themes and Related settings.
3. Finally, click Classic theme settings link to open the classic Personalization window.
Network and Sharing Center applet: This will enable a user to configure his network connections. To open the applet perform below steps
1. Right-click the network icon in the Taskbar.

2. Select “Open Network and Internet settings”
3. Now scroll down and click on the link named “Network and Sharing Center”

Reconnect at Logon: You can select Reconnect at Logon for reconnecting to a network drive at logon.
Character Map: You can use Character Map to copy and paste special characters into your documents, such as the trademark symbol, special mathematical characters, or a character from the character set of another language. To open character Map
To open character map in windows 10
Way1: Access it by searching.
1. Type map in the search box on taskbar, and choose Character Map from the result. The screenshot is shown below

Way 2: Turn it on in Start Menu.
1. Open Start Menu, choose All apps, expand Windows Accessories and hit Character Map

Privacy screen or privacy guard: Privacy screen or a privacy guard protects the sensitive information on your screen while also protecting the screen itself from scratches and damage. It is useful when traveling or in public place in preventing prying eyes from seeing what's on your laptop screen. And it's thin enough that it still allows your laptop to close and latch.
To uninstall a application: You can use Programs applet in the Control Panel to add or remove a program. Programs and Features is the place to go in the Control Panel (CP) to remove an application in Windows7.
To uninstall apps in windows 10: You can uninstall both apps and traditional desktop programs directly from the Settings menu in windows 10. To do this, you need to do the following:
1. Open the Start menu.
2. Click Settings.
3. Click System on the Settings menu.
4. Select Apps & features from the left pane.
5. The Apps and Features display all the installed apps on your PC. These applications can also be sorted on the basis of their size. Locate the application you wish to uninstall and click on the Uninstall button. You will be prompted with a message saying "this app and its related info will be deleted", click Uninstall to delete the programs in Windows 10.


You can enable memory dump to a file when your system is about to crash due to Stop Error (such as Blue Screen)
The following types of memory dumps are available with Windows 8/8.1/10
1. Complete memory dump: A complete memory dump is the largest type of possible memory dump. This contains a copy of all the data used by Windows in physical memory.
2. Kernel memory dump: A kernel memory dump records only the kernel memory. This speeds up the process of recording information in a log when your computer stops unexpectedly. You must have a pagefile large enough to accommodate your kernel memory.
3. Small memory dump (256 KB): It contains the blue-screen information, a list of loaded drivers, process information, and a bit of kernel information. It can be helpful for identifying the error.
4. Automatic memory dump: This is the default option, and it contains the exact same information as a kernel memory dump.
You can open Windows Update in any of the following ways to check for latest help files or updated drivers:
1. Click Start | Control Panel | System and Security | Windows Update
2. Click Start | Control Panel | Windows Update
3. Type "Windows Update" on Start menu Search
4. Right-click Action Center | Open Windows Update on the notification area
5. After opening Windows Update, click "Check for updates" on the left pane

Windows 7 provides Windows Update through Control Panel > Windows Update. However, Windows 8 and Windows 8.1 provide access to Windows Update app through both Control Panel and PC Settings app. In Windows 10, to access Windows update feature, select the Start button, select Settings > Update and security > Windows Update. Ctrl+Esc will pop-up Start menu in Windows 7.
To view Hidden files in Windows 7: On your Windows 7 computer, you can use the View tab in Folder Options of Appearance and Personalization applet in the Control Panel to show / hidden files and folders that have "Hidden" attribute set. You can also use Windows Explorer -> Organize -> Folder and Search Options -> View tab.
To view Hidden files in windows 10: By default, Microsoft Windows 10 hides certain files from view when you explore them on your hard drive. This protects important files from being deleted so that the system isn’t damaged. If you want to view all files all the time. Follow these steps to show hidden files.
Option1: From File Explorer
1. Select the "Start" button, then choose "File Explorer".
2. Make sure the menu bar is expanded. You can toggle the menu bar by selecting the ^ at the upper right portion of the window.
3. Select the "View" tab and Check the "Hidden items" check box to view hidden items.
4. If you need more file viewing options, select "Options" > "View".
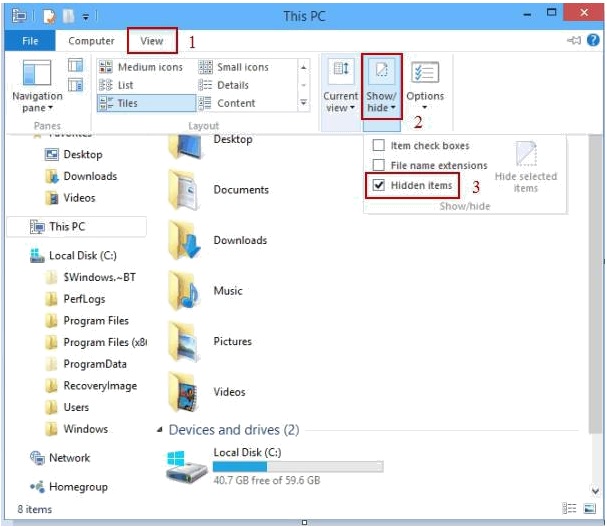
Option2: From Control Panel
1. Right-click the "Start" button, then select "Control Panel".
2. Go to "Appearance and Personalization", then select "File Explorer Options".
3. Click the "View" tab.
4. Scroll down a bit and change the "Hidden files and folders" setting to "Show hidden files, folders, and drives". Optionally, you may wish to uncheck the "Hide protected operating system files" box as well.

Power Options:
Sleep mode: It is a power-saving state that is similar to pausing a DVD movie. All actions on the computer are stopped and any open documents and applications are put in memory. You can quickly resume normal, full-power operation within a few seconds. Sleep mode is basically the same thing as “Standby” mode. The Sleep mode is useful if you want to stop working for a short period of time. The computer doesn’t use much power in Sleep mode. In Sleep mode, any open documents and applications are put in memory while the computer goes into a low -power state. The computer technically stays on, but only uses a smaller of power, and the LED screen will also be off. You can quickly resume normal, full-power operation within a few seconds. Sleep mode is basically the same thing as "Standby" mode. Sleep mode is useful if you want to stop working for a short period of time.
Hibernate mode: Saves your open documents and running applications to your hard disk and shuts down the computer, which means once your computer is in Hibernate mode, it uses zero power. Once the computer is powered back on, it will resume everything where you left off. Use this mode if you won’t be using the laptop for an extended period of time, and you don’t want to close your documents. Hibernate mode is very similar to sleep, but instead of saving your open documents and running applications to your RAM, it saves them to your hard disk. In other words, Hibernation mode stores the current session on to the hard disk, and resumes the current session when the computer is switched on. This allows your computer to turn off entirely, thus saving power. Once the computer is powered back on, it will resume everything where you left off. This mode is useful if you don't want to close your documents when you are away for longer periods of time, and would like to continue where you had left off. Hibernate saves an image of your desktop, including all open windows and files. Then it powers down your computer just as if you had turned it off. When you turn your computer on again, your windows and files are open just as you left them.
Stand by: It is a mode the computer, monitor, or other device enters when idle for too long. This mode helps conserve power when a computer or computer device is not in use without having to sacrifice the time it would take to turn off and on the computer. When in Stand by, the computer or monitor has a solid or flashing amber light, indicating that there is still power but the computer is in Standby mode. When you select Standby, the power to your screen, hard drive, and peripheral devices is cut. However, the power to the computer's memory (RAM) is maintained so your open files stay open. Shutdown basically shuts down your computer completely. If you are going to be away from your computer for an extended time or overnight, putting your system into hibernate mode puts your system into an even deeper sleep than Standby mode and is essentially just short of a complete shutdown.
You can also change the amount of time before your computer goes into sleep or hibernate mode, or turn off each mode completely. To configure any of the power options, you first have to go to Start, then Control Panel, and then click on Power Options.
In the Power Options properties dialog, there are six tabs: Power Schemes, Alarms, Power Meter, Advanced, and Hibernate.
In the Advanced tab you will be able to configure the action that would take place when the laptop lid is closed.

In Windows 7, the Sleep and Hibernate options are accessed using the arrow button next to the Shut down button on the Start menu.
You can set the password policy using Local Security Policy option. Follow following steps to Open "Local Security Policy":
1. Click the Start button and type “secpol.msc” into the Search box.
2. Click secpol [Note: Administrator permission required i you are prompted for an administrator password or confirmation, type the password or provide confirmation].
3. In the Navigation pane, double-click "Account Policies".
4. Click on "Password Policy" in right pane. - F
You can also go there using Administrative Tools option in Control Panel, then clicking on Local Security Policy option.
Changing account lockout policy
1. Open the Control Panel (icons view), and go to Administrative Tools.
2. In the right pane, double click on Local Security Policy to open it.
3. You can now set and manage the Local Security Policies on your computer as per your requirement.
This file is located at C:\Windows\System32\secpol.msc. (See screenshot below)

POST test card: A POST test card is a small diagnostic tool that displays error codes generated during the Power On Self Test. These errors, called POST codes, correspond directly to a test that has failed and can help determine what piece of hardware is causing an issue. Most POST test cards plug directly into expansion slots in the motherboard while a few others connect externally via a parallel or serial port. Also Known As: Power On Self Test card, POST card, POST diagnostic card, checkpoint card, port 80h card
Color Depth: Given below are some commonly used color depths and the number of bits required to store the color information per pixel:
1 bit (mono): 2 colors
2 bits: 4 colors
4 bits: 16 colors
8 bits: 256 colors
16 bits: 64K colors
24 bits: 16.7M colors
The following are the important characteristics of Windows HomeGroups:
1. HomeGroup computers connect to one another by a using a common password. You can access HomeGroup by going to Control Panel\Network and Internet\HomeGroup
2. HomeGroup computers share Windows libraries but not the Folders by default. However, you may share any folder by browsing to the specific folder. To do this, right click on the folder, and select "Share with" as shown in the figure below:
3. HomeGroups are not available in MAC OS X, Windows Vista, and Linux Distros.
4. You can connect Windows 7 and Windows 8 computers to share HomeGroups.

Windows 10 Firewall: Microsoft Windows 10 comes pre-installed with a software firewall utility.
To enable the Windows 10 firewall:
Control panel -> System and security -> Windows Firewall -> Turn Windows Firewall on or off

Backup and Restore: Windows 10 has a backup and restore utility that can be used to backup or restore files and folders.
To create a System Image Backup on Windows 10
To create a full backup of your computer using the system image tool, use these steps:
1. Open Control Panel.
2. Click on System and Security.
3. Click on Backup and Restore (Windows 7).

4. On the left pane, click the Create a system image link.

5. Under "Where do you want to save the backup?" select the On a hard disk option.
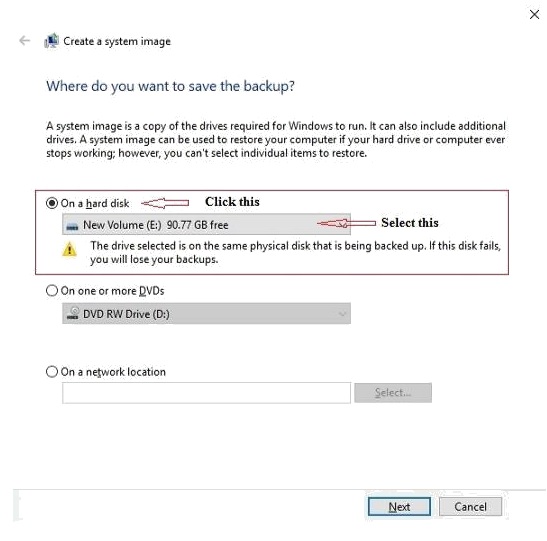
6.Using the "On a hard disk" drop-down menu, select the location to save the backup.
7. Select any additional drives that you may want to include in the backup.
8. Click the Next button.
9. Click the Start backup button.
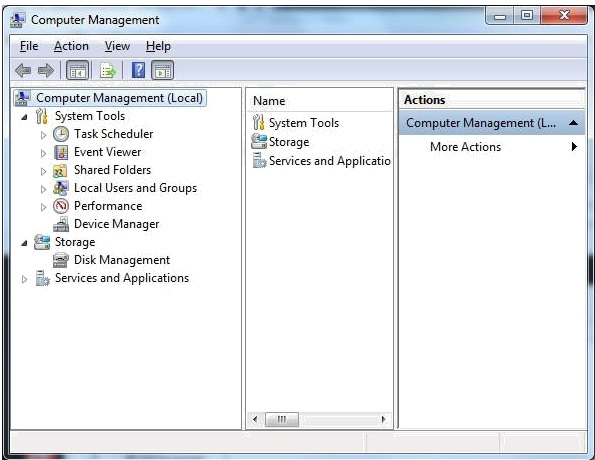
To open Computer Management in Windows 10:
1. Open it in the Start Menu.
Click the lower-left Start button to open the menu, type “compmgmt.msc” in the blank box and tap compmgmt.
4 ways to open Task Scheduler on Windows 10
Way 1: Open it in the Start Menu.
Click the lower-left Start button, enter “schedule” in the empty box and select Schedule tasks from the results.
Way 2: Turn on Task Scheduler via Search.
Tap the Search button on the taskbar, type schedule in the blank box and choose Schedule tasks.
Way 3: Open it in the Control Panel.
Step 1: Access Control Panel.
Step 2: System and Security > and tap Schedule tasks in Administrative tools
Way 4: Open Task Scheduler in the Computer Management.
Step 1: Open Computer Management.
Step 2: Click Task Scheduler on the left.
The Task Scheduler window appears , Now, you can select a new task from the menu Action -> Create Task.
Action Center: It is a central place to view alerts and take actions that can help keep Windows running smoothly.
You can use either of the below ways to open Action center utility in windows 7
1. Start > run > wscui.cpl
2. Start > Control Panel > System and Security> Action Center in windows 7 system
Action center has new name in windows 10 as “Security And Maintainance” You can find it in the Control Panel app.
1. Start > Control Panel > System and Security> Security and Maintenance

